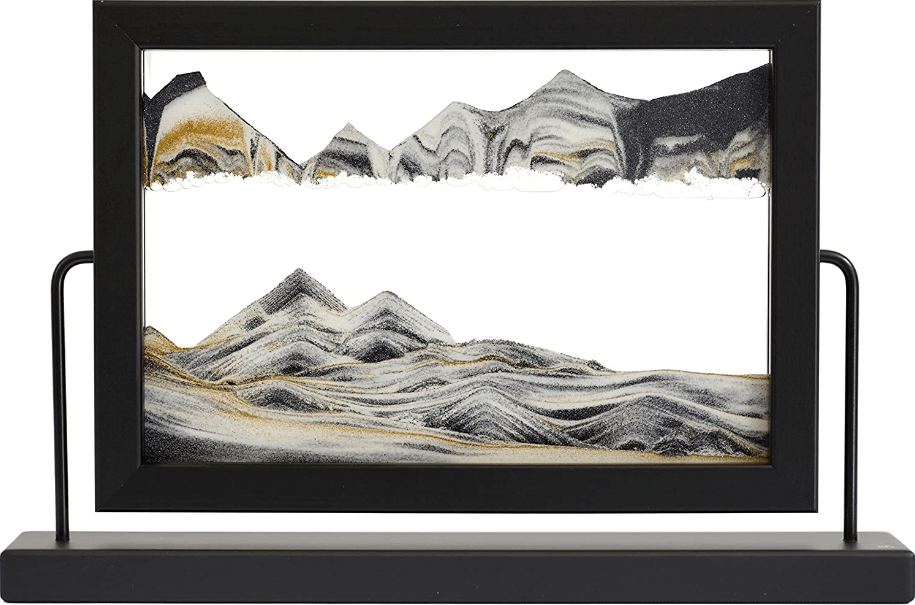
Some people like taking on different art projects and coming up with new ideas to make something unique. As a result, fascinating and one-of-a-kind art is made, which captures everyone’s attention. Sand picture art is an example of such a creation.
Sand art has origins that date back to the Native Indians. The concept of sand picture art is pretty unique and exciting. It is the type of art created by the intricate and calculated use of sand in a container. It is then utilized in glass frames with two glass panels with a slight separation between them filled with sand and sometimes water. When you turn the sand picture upside down, gravity pulls the sand to the bottom, making interesting patterns. Each flip gives you a unique design and something new to see.
If you want to learn more about sand picture art, you are in the right place because we will discuss all the main things about sand picture art in this guide.
How to Make Sand Picture Art
Sand picture art is also a great project to make and work on in your spare time.
Materials
To make sand picture art, you will need the following things:
- Two identical picture frames with glass
- A quarter-inch gasket material
- Silicon aquarium sealant or any other adhesive
- Colored sand (at least in two different colors)
- Distilled water
- Duct tape
- Scissors
- A clean cotton cloth
- A funnel with a quarter-inch nozzle
The Making Procedure
The sand picture art is done with the following steps:
- The first thing to do is take the back off each picture frame and separate the glass from other parts of the frame. After doing that, you should wipe down the sides of the glass and put a glass on a flat table.
- Now you need to think of a design you want to recreate, such as mountains, oceans, or any pattern of your liking. After that, start by creating several sketches to work it out. Once you are done finalizing the design, carve the shape of it from the rubber-gasket material. Leave some space between them so that you can pour the sand through.
- Next, trim the gasket to make linings for the glass’s outer edge. You also have to make space for the sand and water to flow around. After that, cut an inch of a section from the top of the gasket and set it aside.
- Use a silicone adhesive and glue the gasket pieces to one side of the glass and let it dry for a little bit. Once it’s done drying, put some adhesive on the gasket’s other side and glue it to the second pane of the glass. Make sure that the seal is tight.
- The top of the glass should have an opening of an inch. You can test the power of the seal by pouring a small amount of water into the void. If it goes well, take the water out.
- Now measure a quarter to a half cup of colored sand that you want to use. Pour the sand down the opening through the funnel and in between the glass. Ensure that the glass edges are secure before you pour the sand; you can add some glue if necessary. After pouring all the sand in, pour some distilled water through the funnel and in between the glass.
- After that, you have to check whether there’s a hole in the designed lining or not. If there is a hole, you need to drain out all the water, let the glass dry, and secure the opening with an adhesive, and try again.
- When the frame is almost filled with water, hold the panes in a vertical position with the help of two book stacks or similar items, and if you want, you can add more sand. After that, glue an inch of the section of the gasket and let it dry. Add a tiny amount of adhesive around its edges to cover the seal.
- You can also cut quarter-inch strips of duct tape to support the adhesive. Apply them to the edges of the glass, and glue the edges to the side of the frame. Once it dries, glue the other side of the glass onto the other side of the frame.
- Polish outer side of the glass, and your sand picture art is ready.
Sand Picture Art – A Unique Art
As we discussed above, sand art is one of the unique forms of art to have been made. It dates back to Native origins and has been utilized in art over the years in different ways. It utilizes the use of sand to create different patterns within a glass frame resembling natural landscapes.
Every time the frame moves, the sand forms a new pattern. It is something you must check out as it is a fantastic work of art and absolutely eye capturing.
